Table Of Content
- Introduction to Cloud Firestore Firebase Android App Tutorial
- Part 1: Setting Up the Android Project for Cloud Firestore Project
- Part 2: Implementing the Mobile App Communication with Cloud Firestore
- Part 3: Supplying the App with Data from Cloud Firestore
- Part 4: Creating Data in Cloud Firestore from the Android Application
- Cloud Firestore Firebase Tutorial Final Results
Introduction to Cloud Firestore Firebase Android App Tutorial
Cloud Firestore is the newest Google’s NoSQL database that Google now uses instead of Firebase. Unlike the Firebase database, Firestore features a more intuitive data model, a more comprehensive and faster set of queries, more extensive security rules, automatic scalability, and performance improvements.
In this hands-on tutorial, we demonstrate using a Firestore database for a corporate mailing list Android application. This app is a utility mobile client that lets a user create and read Contact information. The application is intended to be simple enough to grasp the basic concepts and quickly get started with Firestore.
The app uses a RecyclerView to display a large set of Contacts in scrolling list. Each Contact is contained in a CardView using a reusable Android style for a custom look and feel.
Also, this app includes a Contact Details screen that allows the user to generate new Contact information and send it to the Firestore database. We explain in this guide how Firestore is capable of internally converting our custom Java object, intended to represent a Contact, into supported data format that can be written to the database
Part 1: Setting Up the Android Project for Cloud Firestore
1.1 Start the Android Mobile Project
To begin, clone the materials for this tutorial from this GitHub link or type the following command in a command-line interface:
git clone https://github.com/krasamo/CorporateMailingList_Partial.git |
Open the project in Android Studio 3.5+, then build and run to see the application working.
You may notice, the graphical interface of the app is complete, but it doesn’t have any functionality yet. Fortunately, you’re here to complete the job!
1.2 Create the Main Screen
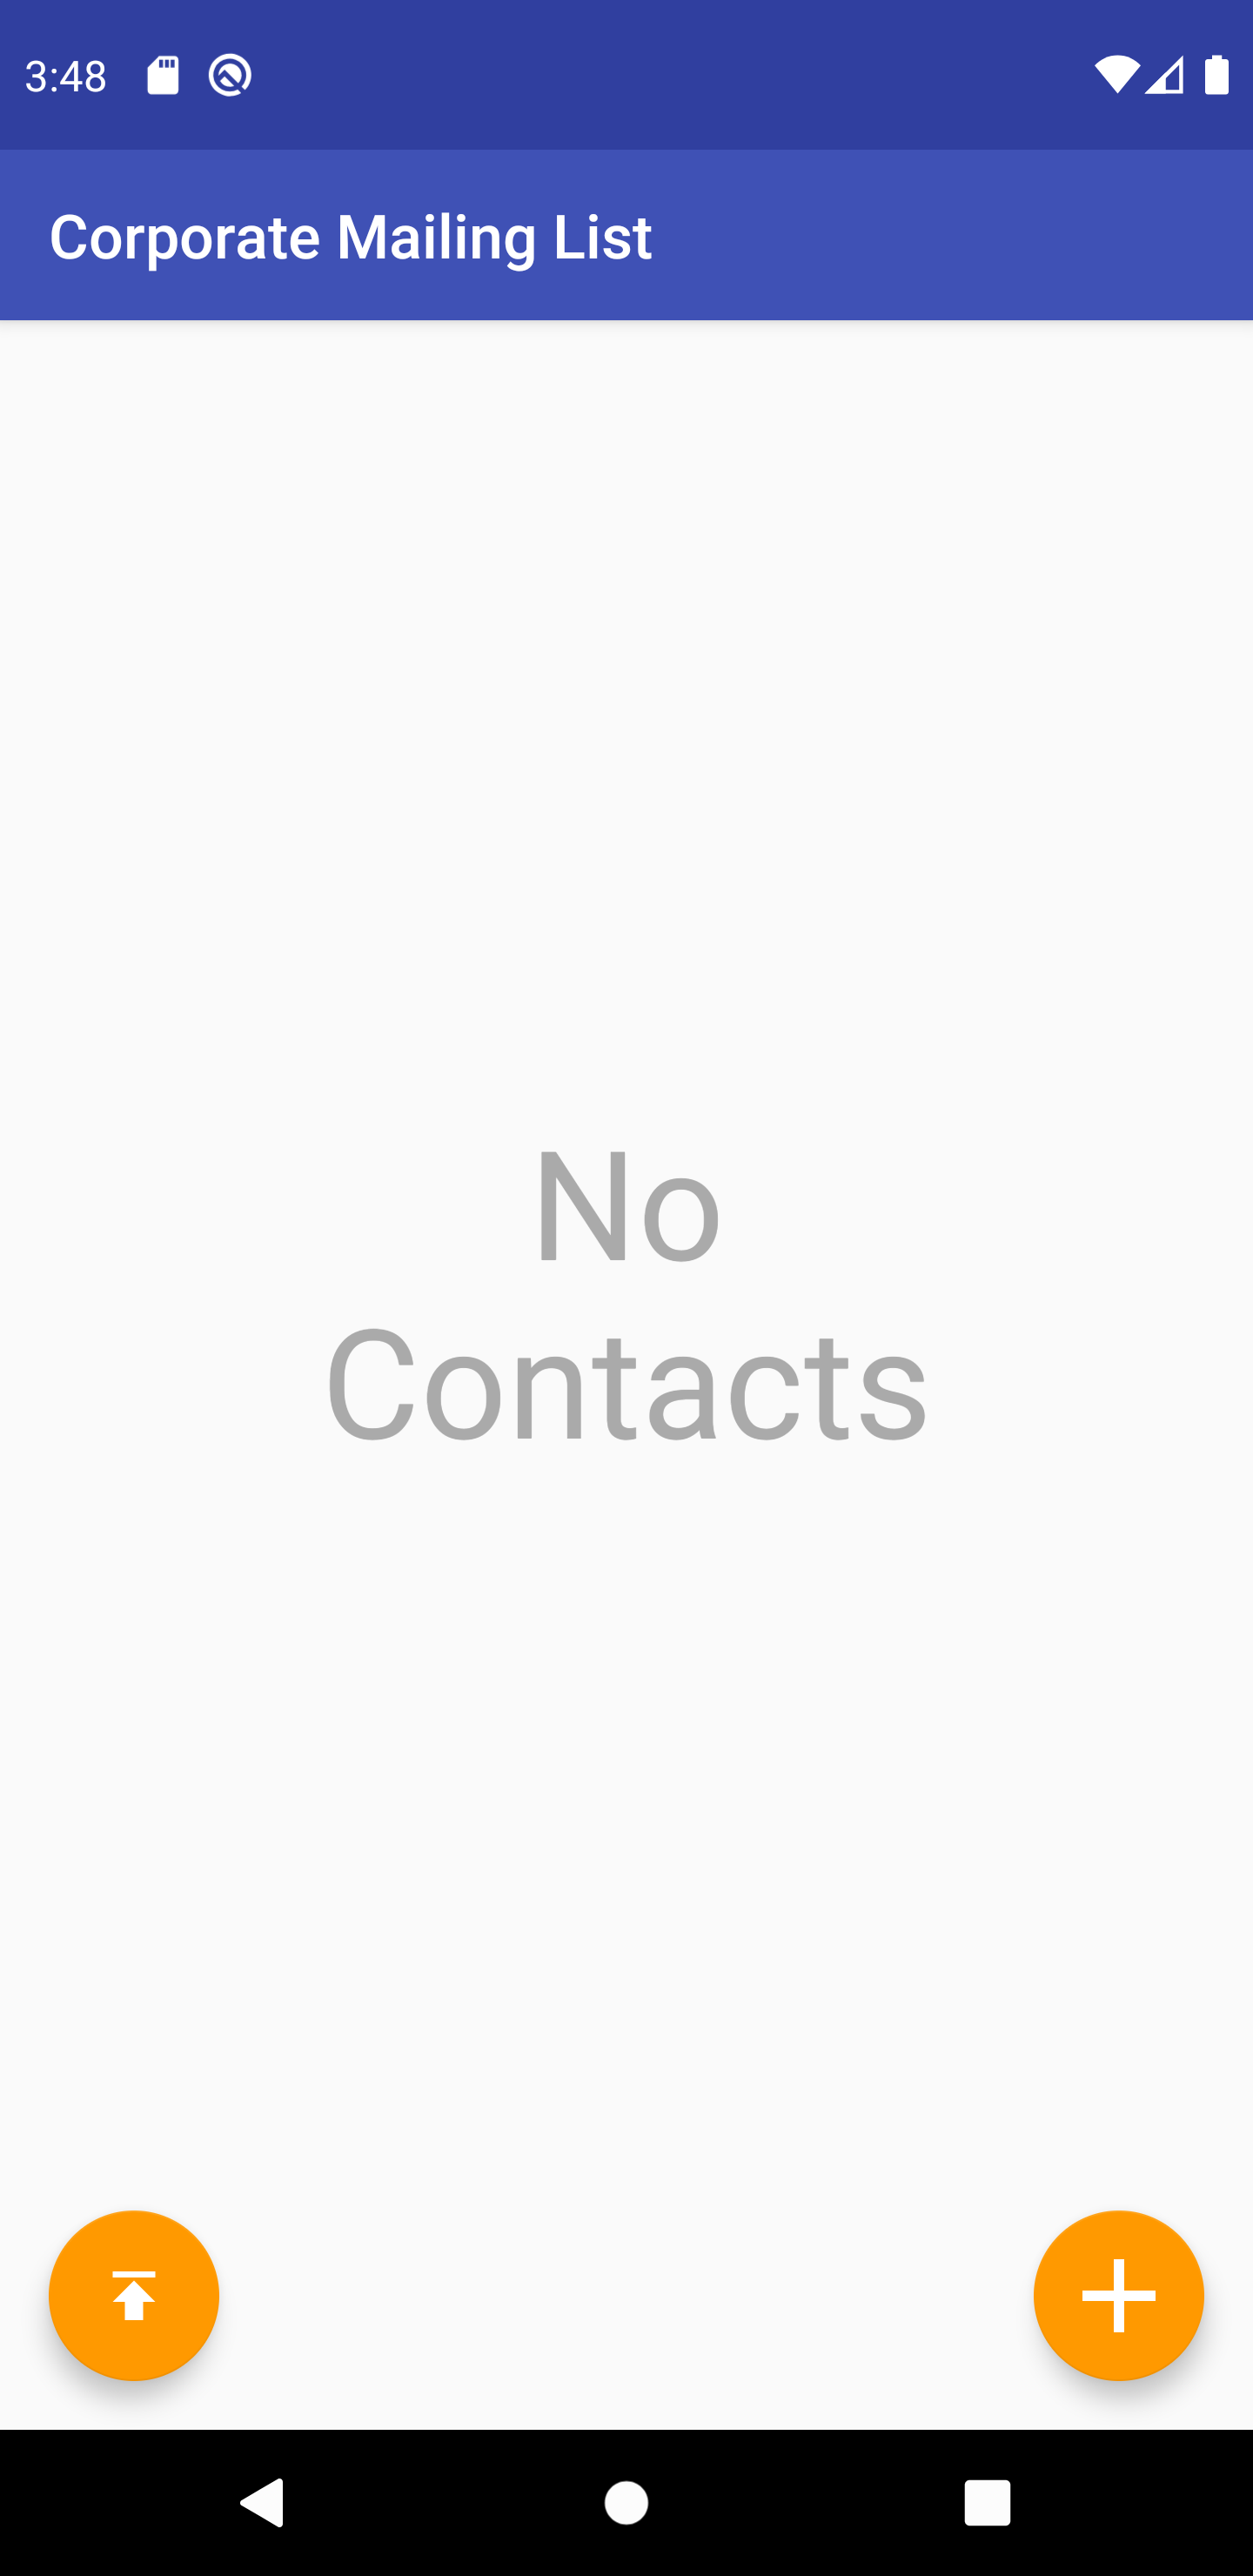
Now let us look at the main screen. It shows either the Contact list retrieved from Firestore or a “No Contacts” message if there are no Contacts.
When the user clicks the upload button ( ↑ ), the app will send a bulk of pre-made Contacts to the Firestore database. We did this so we can have some data available to populate our main screen without needing to type in the data manually.
1.3 Create the Contact Details Screen
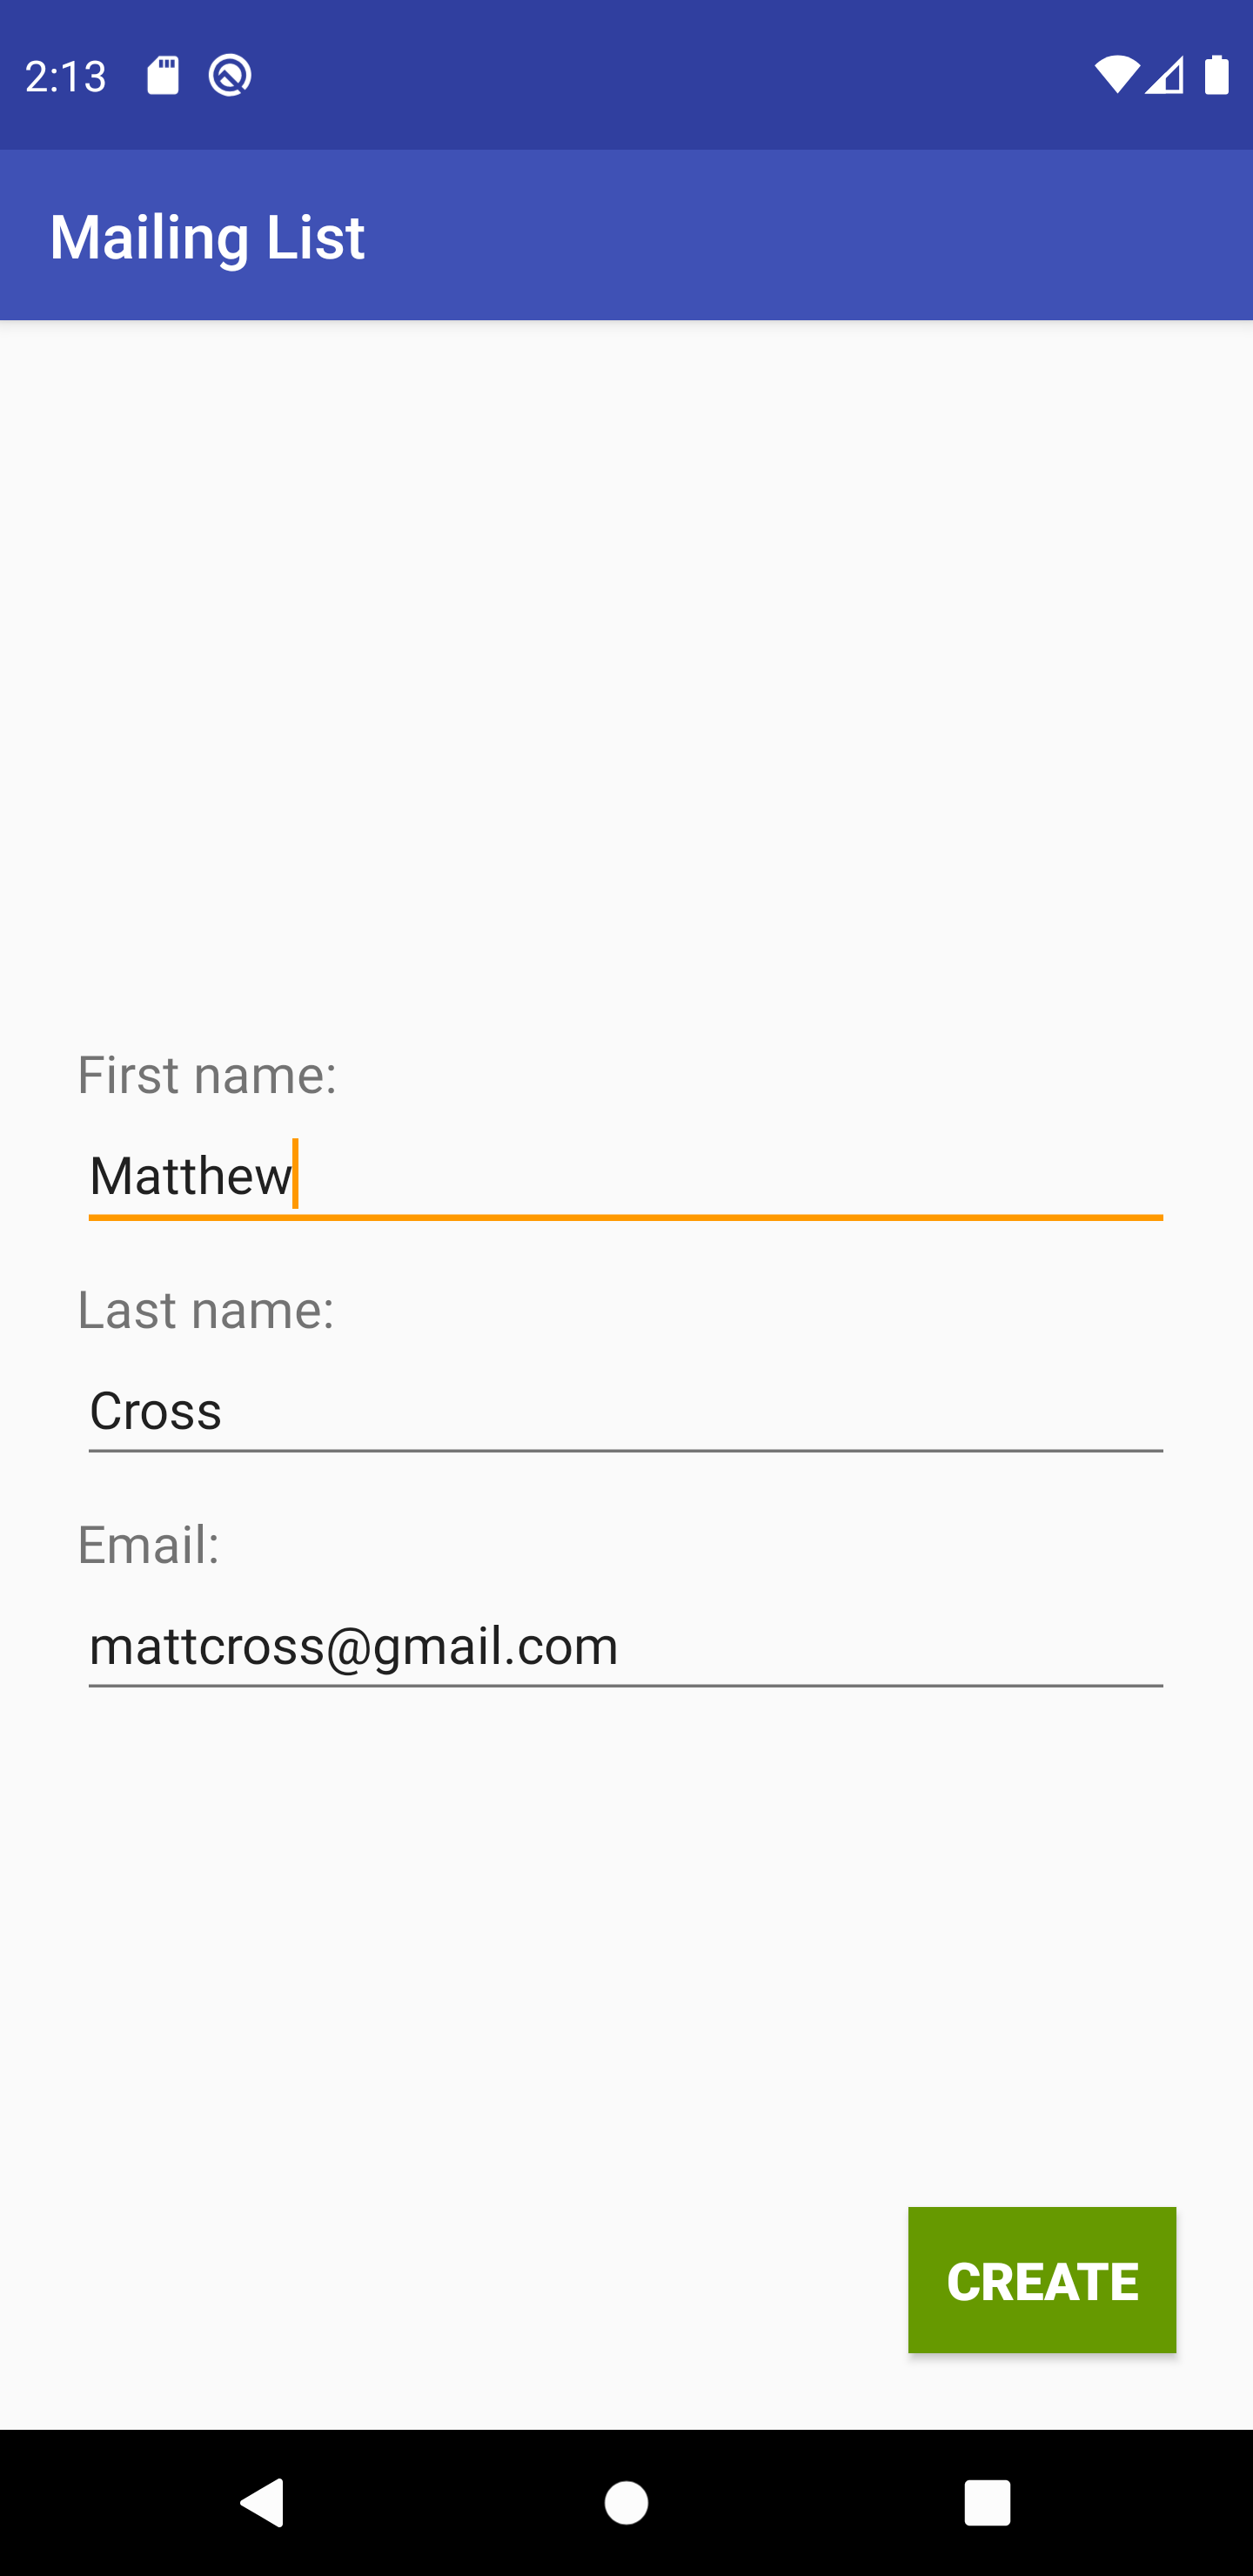
Next, take a look at the Contact Details screen. It is used for the following cases:
1. When the user presses the add button ( + ), from the main screen, they are brought to the Contact Details screen to fill the form and create a new Contact in Firestore by pressing the “CREATE” button.
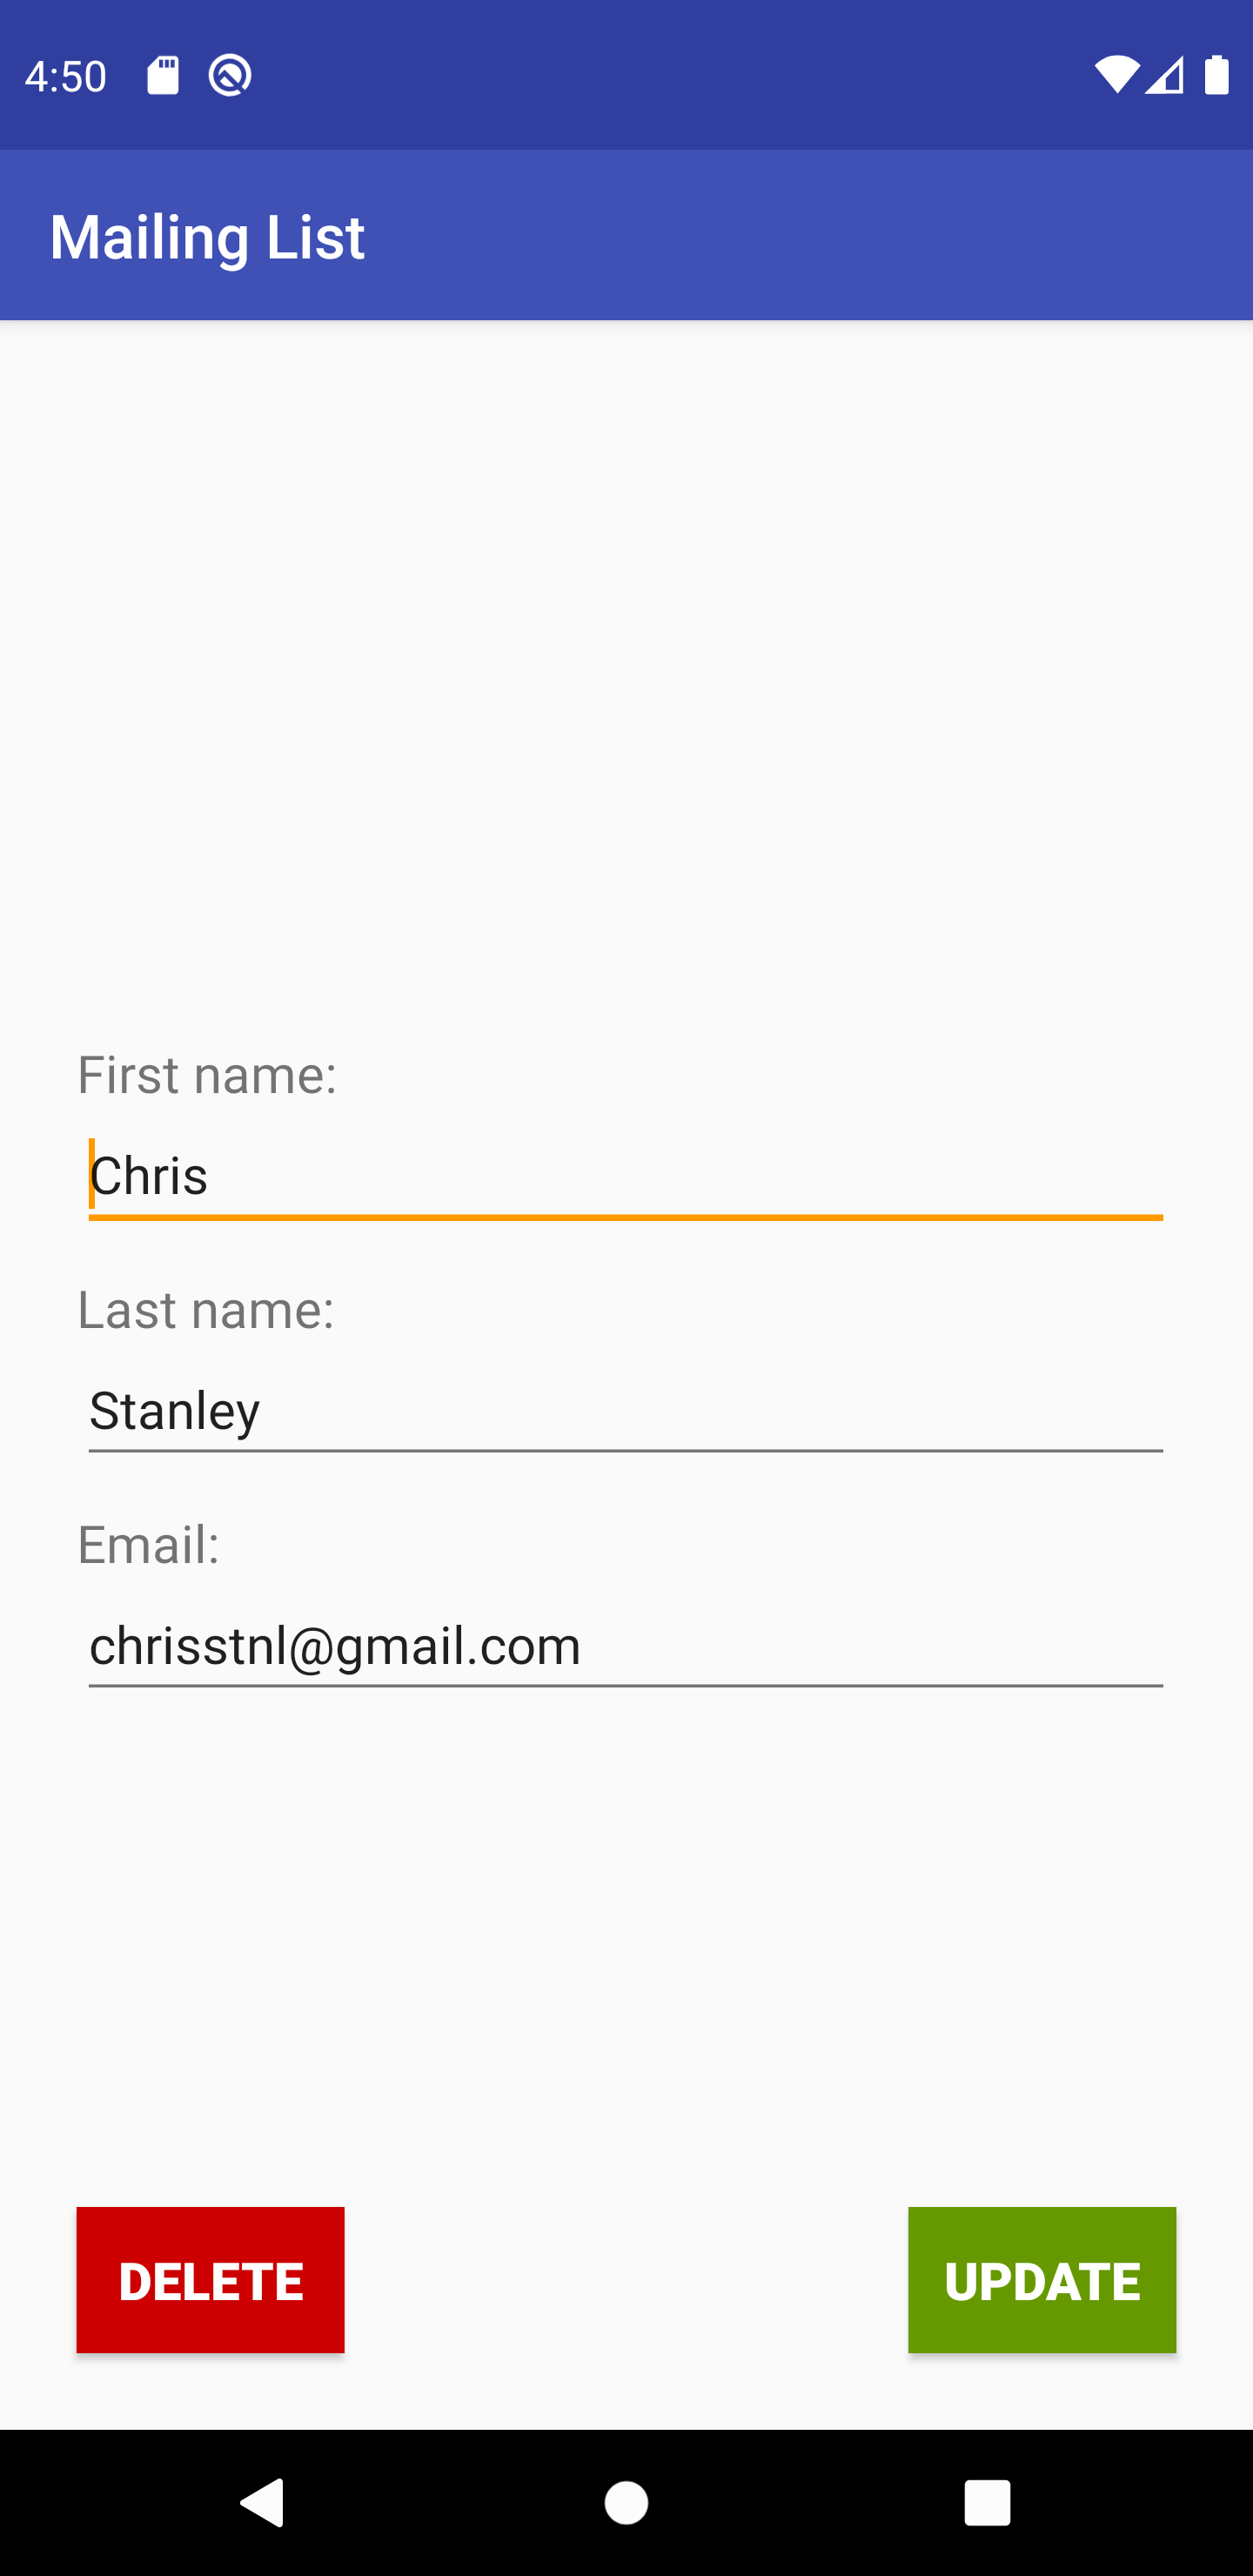
2. When the user presses on a Contact from the main screen, they are also brought to the Contact Details screen. However, this time, the form is filled automatically with the Contact information, and the user will be able to either update the Contact information or delete it from Firestore.
1.4 Setup Cloud Firestore in the Project
Now that you are familiar with the project, we will create a Firestore database to write and read data from in the Android app.
In Android Studio, go to “Tools => Firebase” to open the Firebase Assistant. Expand the “Firestore” option located at the bottom and click the link: “Read and write documents with Cloud Firestore” to open the instructions to set up FIrestore. We can both create a Firestore project and easily set it up through this assistant without leaving Android Studio.
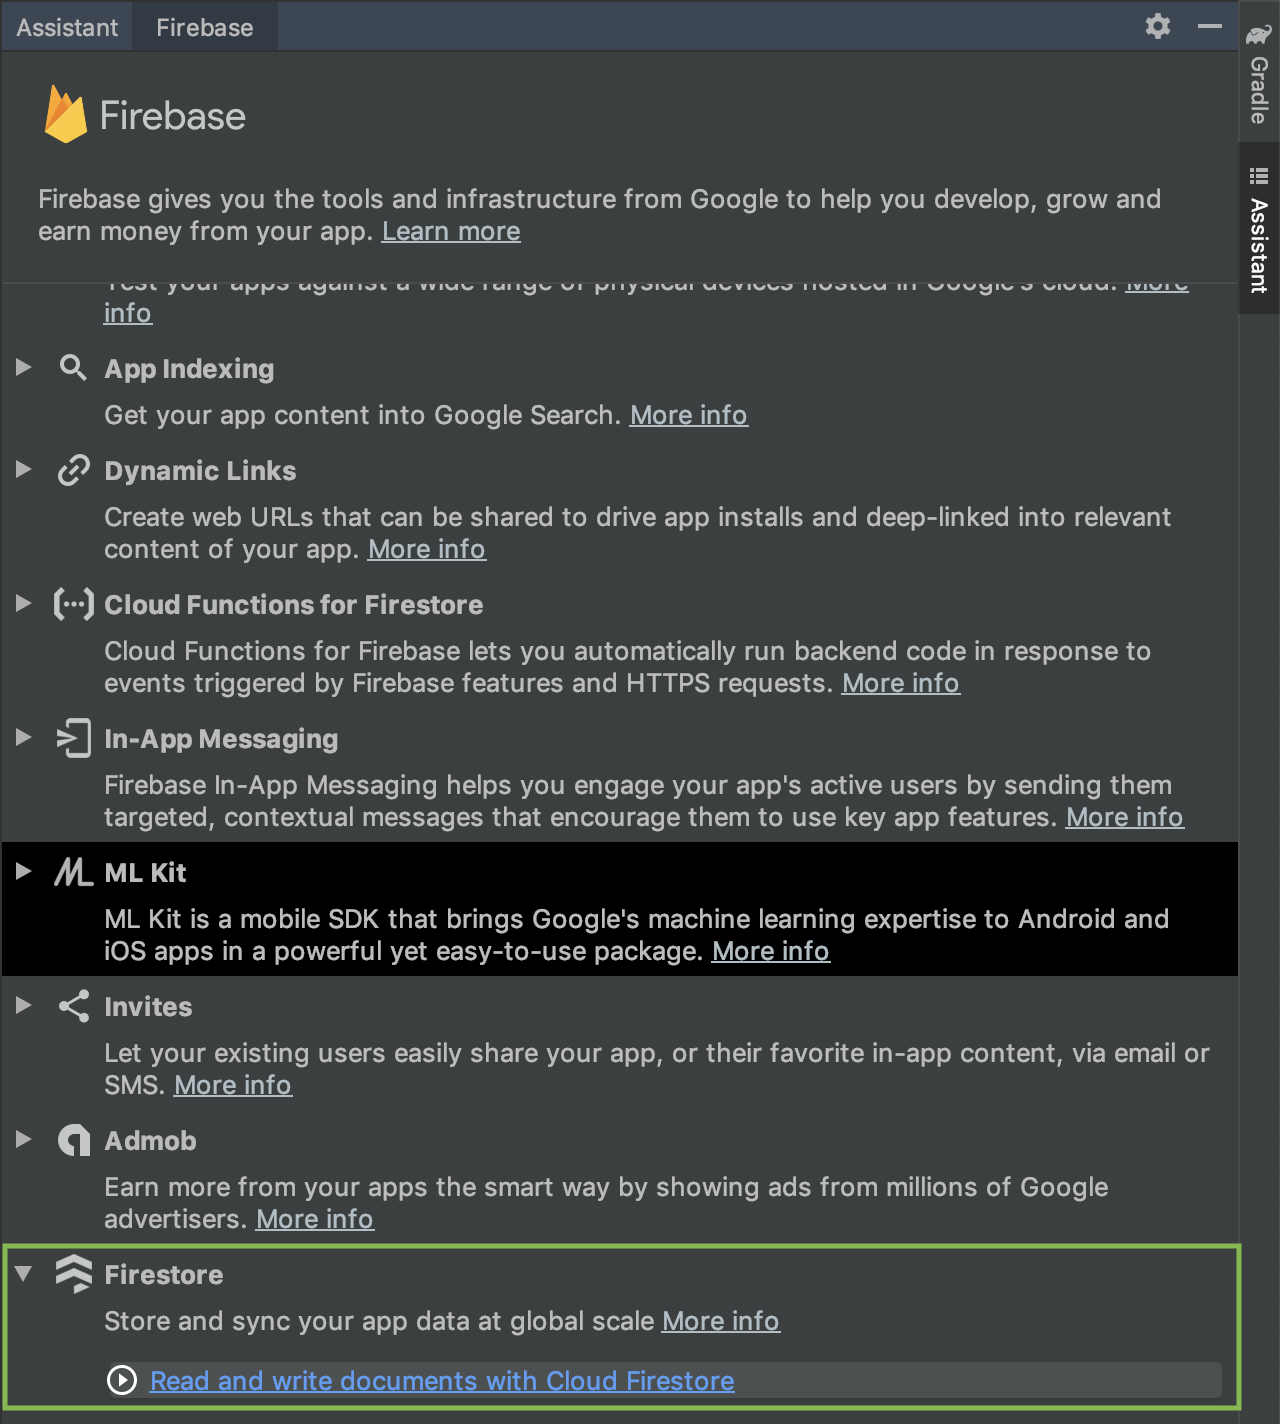
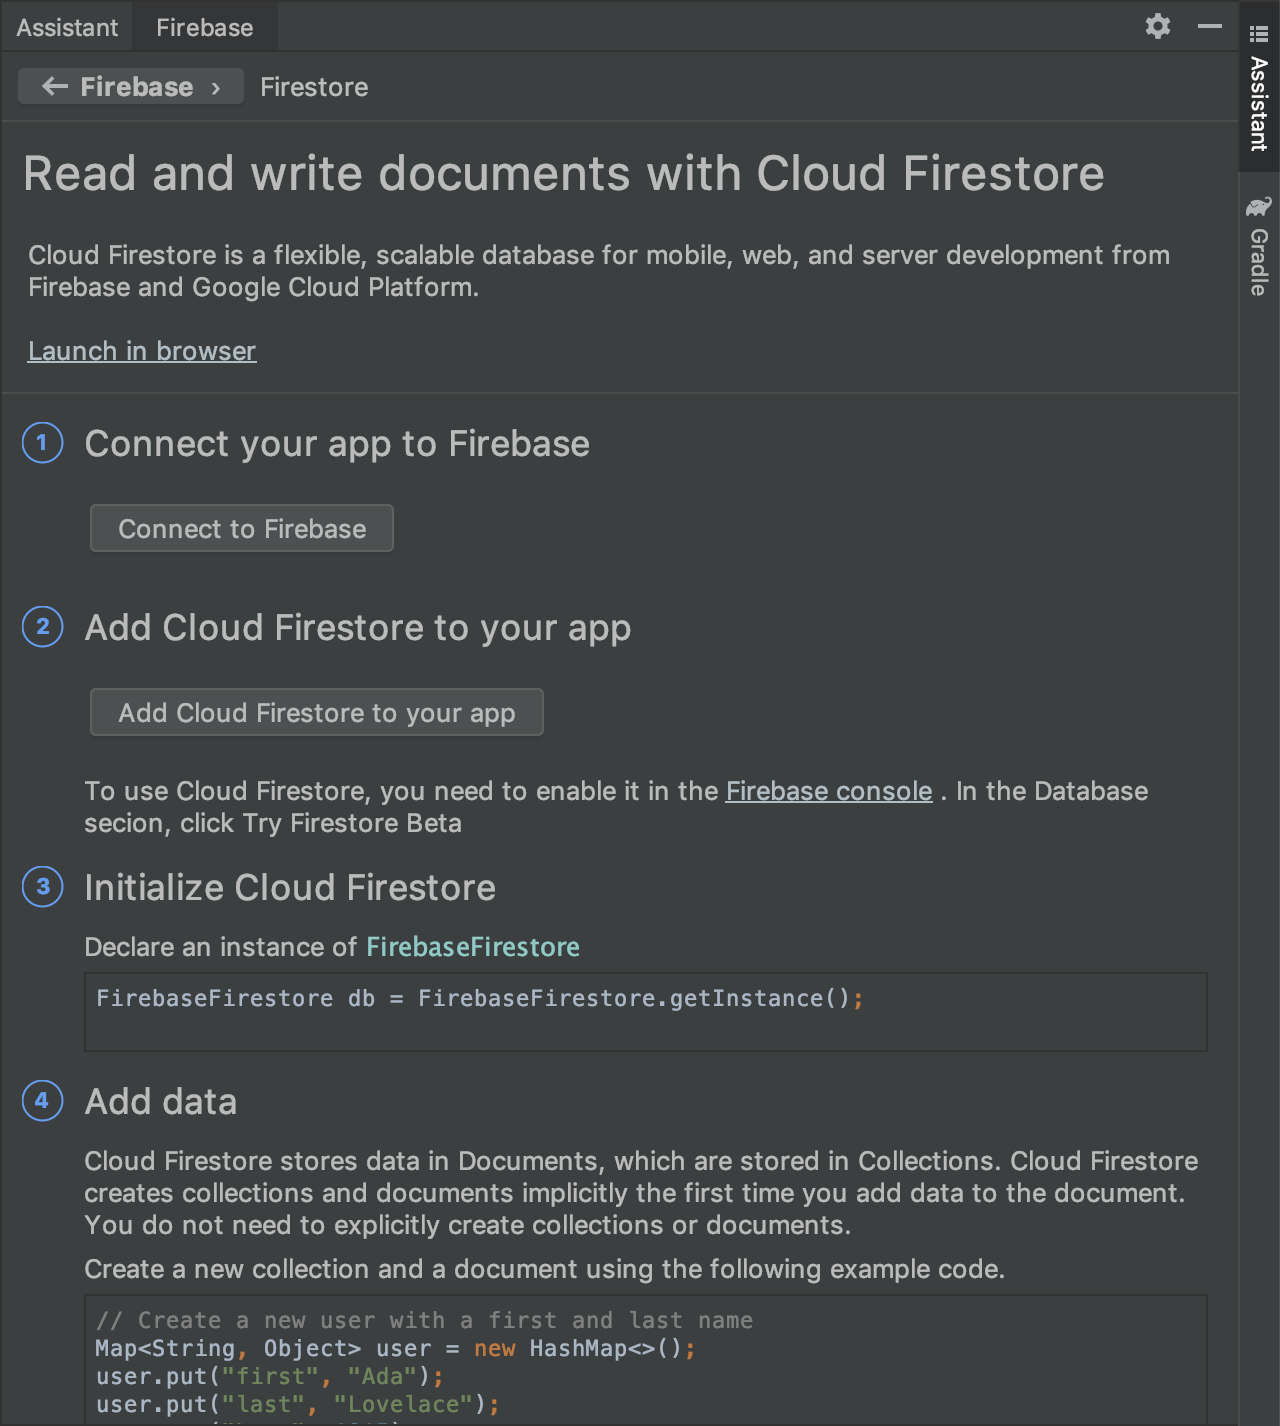
To setup Firestore in our application, we will follow the steps #1 and #2 of the assistant’s instructions. These steps will generate and set all the dependencies required in our project automatically.
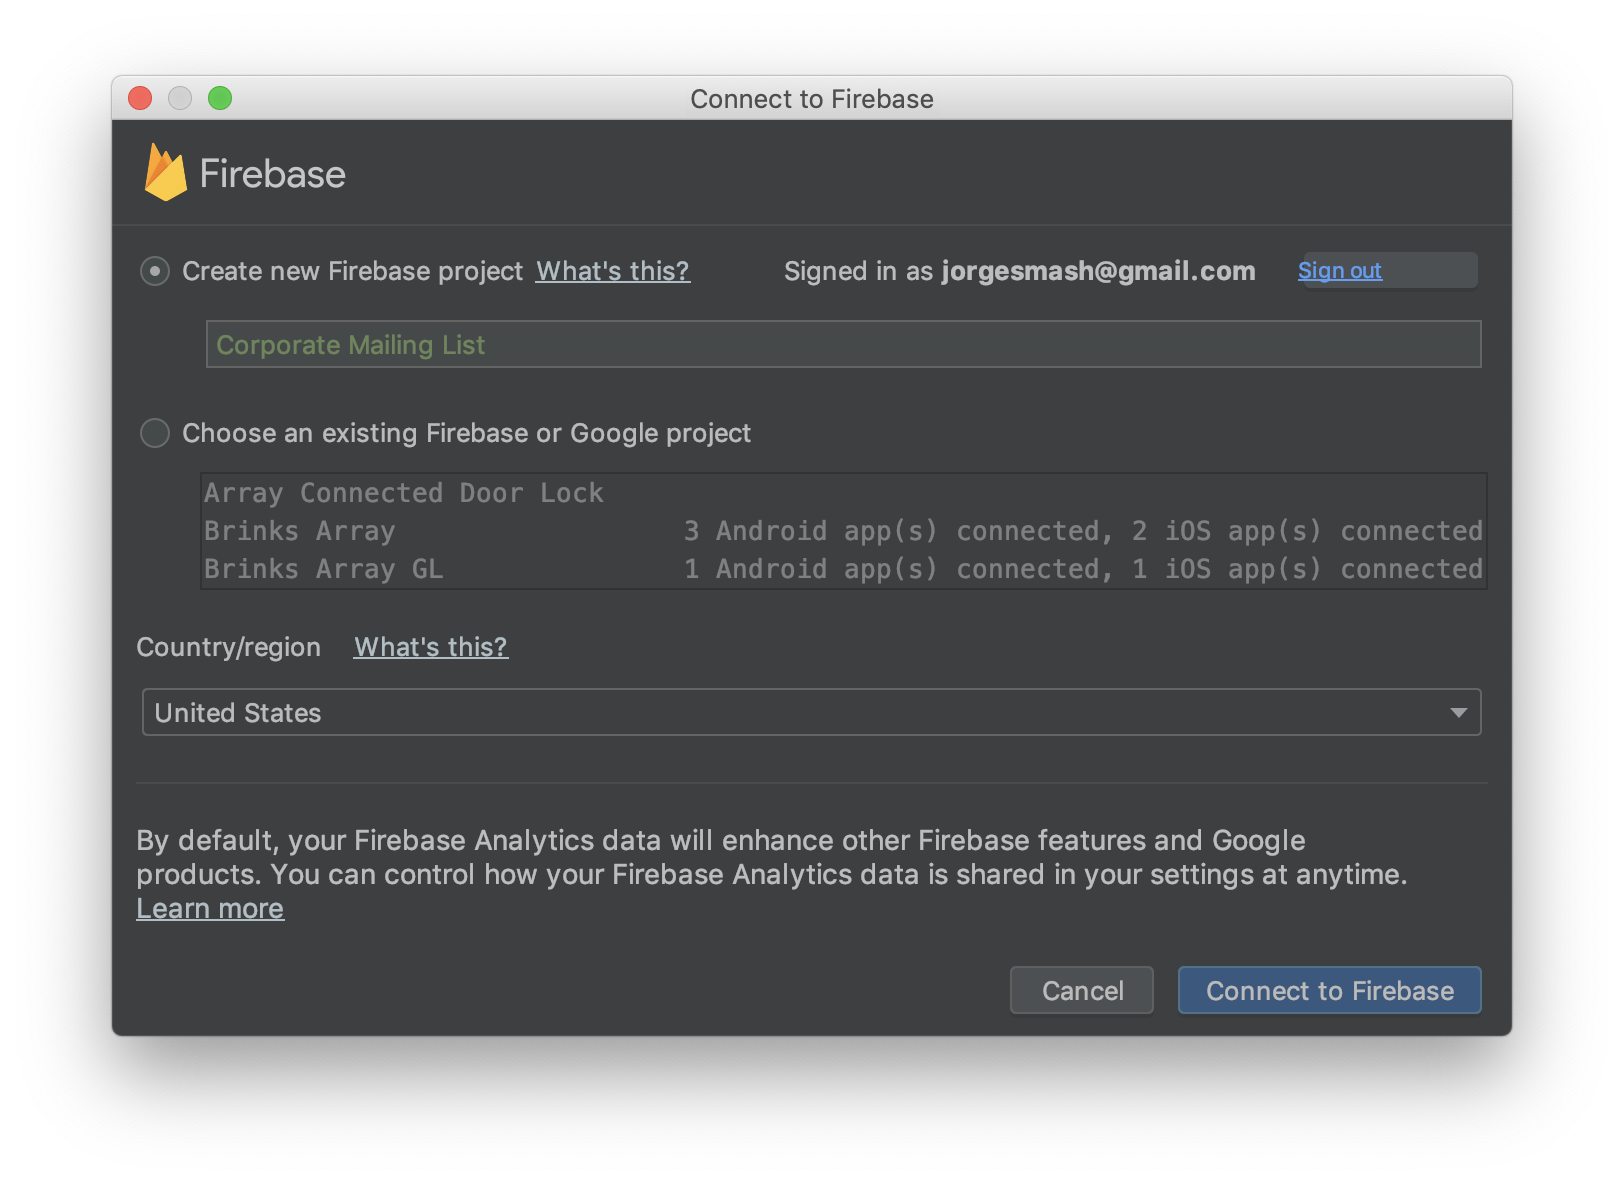
In step #1, please click the “Connect to Firebase” button. It will open a dialog where you can either create a new Firebase project or choose an already existing one. Create a new project with the name “Corporate Mailing List”, then click the “Connect to Firebase” button. Android Studio will create the project and will register our application to it as a client.
In step #2, click the “Add Cloud Firestore to your app” button to open a dialog where you can see the changes that the assistant will perform on both the project-level and app-level Gradle files. It will add the necessary dependencies to support Firestore. Click the “Accept Changes” button to add such dependencies automatically as described in the dialog.
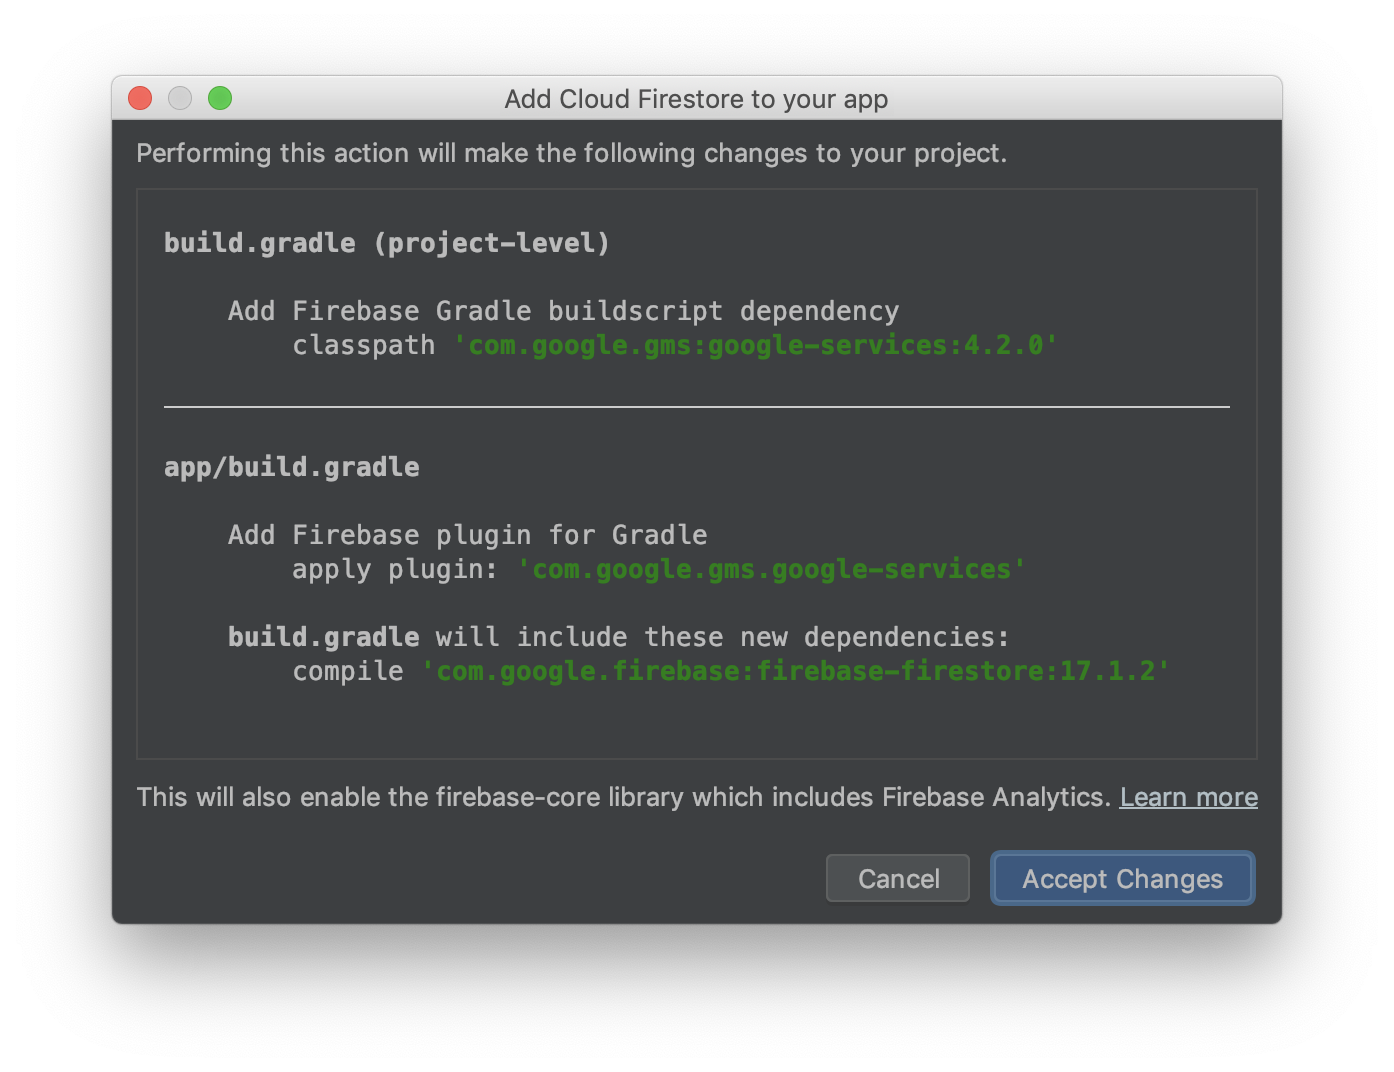
Now, before moving on, update the added dependencies “com.google.gms:google-services” and “com.google.firebase:firebase-firestore” to their latest versions.
Also, in the module-level Gradle file, move the added plugin “com.google.gms.google-services” to the bottom of the file.
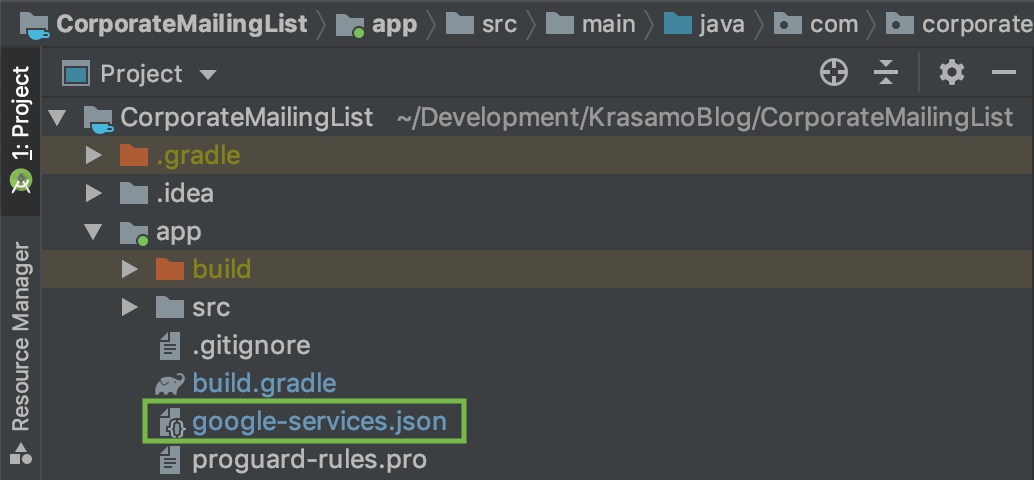
There is one more action that step #2 performed. It has downloaded the file “google-services.json” to the app-level package. This file contains all the required information to connect the application specifically to the Firestore project that you have created.
Finally, make sure you can build your project successfully and you are set to start using the Firestore SDK in your application!
In part 2, you will create the dedicated classes and methods that will enable the communication between our application and Firestore.
Part 2: Implementing the Mobile App Communication with Cloud Firestore
2.1 Define the Contact Data Model
Now that we have created our Firestore database and configured our application to use it, let us work on the application backend to make it capable of transferring information to and from the Firestore database.
First, we will define the data model associated with the data documents that we want to exchange with Firestore. Firestore splits the data into collections, documents and sub-collections. We will store each Contact as a document in a collection of Contacts.
To accomplish this, create a POJO (Plain Old Java Object) class ‘repository/datamodel/Contact.java’. Each Contact in the corporate mailing list is composed of a first name, last name, and email address. Also, each Contact has a document ID that will help us identify a Contact any time we want to operate on it. Firestore generates the document ID, and we can assign the @DocumentId annotation provided by the Firestore SDK to a class property to populate it with the document ID automatically.
Add the corresponding class properties for those Contact fields, as well as the constructors and the associated getters and setters.
public class Contact {
	@DocumentId
	private String documentId;
	private String firstNameString;
	private String lastNameString;
	private String emailString;

	public Contact() {}
	public Contact(String firstNameString, String lastNameString, String emailString) {
		this.firstNameString = firstNameString;
		this.lastNameString = lastNameString;
		this.emailString = emailString;
	}
	public String getDocumentId() {
		return documentId;
	}
	public void setDocumentId(String documentId) {
		this.documentId = documentId;
	}
	public String getFirstNameString() {
		return firstNameString;
	}
	public void setFirstNameString(String firstNameString) {
		this.firstNameString = firstNameString;
	}
	public String getLastNameString() {
		return lastNameString;
	}
	public void setLastNameString(String lastNameString) {
		this.lastNameString = lastNameString;
	}
	public String getEmailString() {
		return emailString;
	}
	public void setEmailString(String emailString) {
		this.emailString = emailString;
	}
}
2.2 Define the Cloud Firestore Database Contract
Following good practices, we will create a contract class that helps us define our Firestore database structure and interact with it. The contract class defines constants that help us identify the features of a database, such as intent actions, content URIs, fields and collection names, etc., thus assisting us in preventing typos and repetition in the code as we implement various features.
public final class ContactsFirestoreDbContract {

	// Root collection name
	public static final String COLLECTION_NAME = "contacts";

	// Document ID
	public static final String DOCUMENT_ID = "document_id";

	// Document field names
	public static final String FIELD_FIRST_NAME = "first_name";
	public static final String FIELD_LAST_NAME = "last_name";
	public static final String FIELD_EMAIL = "email";

	// To prevent someone from accidentally instantiating the contract 		class, make the constructor private
	private ContactsFirestoreDbContract() {}
}
2.3 Create the Cloud Firestore Database Manager Class
To keep the application architecture somewhat organized and the database concerns separated from those regarding the user interface, we will create a manager class that will execute all the operations requested to Firestore. Also, this manager class will pass the retrieved results to the frontend through a callback. The manager is a singleton class, so that it will be instantiated only once along the execution of the application. Please create this new class ‘repository/firestore/ContactsFirestoreManager.java’ and its static method newInstance().
...

/* ContactsFirestoreManager object **/
private static ContactsFirestoreManager contactsFirestoreManager;
...

public static ContactsFirestoreManager newInstance() {
	if (contactsFirestoreManager == null) {
		contactsFirestoreManager = new ContactsFirestoreManager();
	}
	return contactsFirestoreManager;
}

...
2.4 Initialize Cloud Firestore Objects in Android
The most important object of the Firestore SDK to disclose is a singleton class called FirebaseFirestore. It represents the database and is the entry point for all database operations.
Let us get an instance of this class. In our ContactsFirestoreManager class, please create a new object of type FirebaseFirestore and override the class constructor to initialize it.
 ...
/* Firestore objects */
private FirebaseFirestore firebaseFirestore;
...
private ContactsFirestoreManager() {
	firebaseFirestore = FirebaseFirestore.getInstance();
}
...
The next Firestore object required is a class called CollectionReference. We will be working closely with this class, since it contains the methods used to perform database operations. Let us add it to the initialization.
...

private CollectionReference contactsCollectionReference;
...

private ContactsFirestoreManager() {
	...
	contactsCollectionReference = firebaseFirestore.collection(COLLECTION_NAME);
}

...
The object contactsCollectionReference will represent our root collection called “contacts” that will include all the Contact entries. Containers called documents hold each Contact entry. These documents contain fields that represent the information for each Contact.
2.5 Create CRUD Methods for Cloud Firestore Database Operations
Now, we will see how simple it is to implement the methods that will perform CRUD (Create, Read, Update, Delete) operations on the database. What I like the most about these methods is that they are capable of translating POJO classes into their corresponding JSON and vice versa. Therefore, we do not need to code any parsing process, and these methods become as small as a single line of code.
2.5.1 Method for Creating Contacts
Let us start creating the method for writing a Contact to the database. There are several ways to write data to Firestore, but we will use the method ContactsCollectionReference.add(), because it will create the new document and assign it a documentId automatically. Please add the method createDocument() in our ContactsFirestoreManager class. As a parameter, this method receives Contact objects that contactsCollectionReference will send to Firestore.
...
public void createDocument(Contact contact) {
	contactsCollectionReference.add(contact);
}
...
2.5.2 Method for Reading Contacts
Next, let us create the method for reading Contacts from the database. The CollectionReference class extends from Query, which is another Firestore class that takes care of all the methods to perform reading and other auxiliary operations to refine queries such as filtering and ordering. We will use the method ContactsCollectionReference.get() without parameters to retrieve the entire collection of Contacts. Please create a method called getAllContacts() in the ContactsFirestoreManager class that receives a listener as a parameter and returns the retrieved collection of Contacts to the application User Interface.
...
public void getAllContacts(OnCompleteListener<QuerySnapshot> onCompleteListener)
{
  	contactsCollectionReference.get().addOnCompleteListener(onCompleteListener);
}

...
2.5.3 Method for Updating Contacts
Now, let us create the method for updating a Contact in the database. The most suitable method for this purpose is DocumentReference.set(), since it will replace the document identified by the documentId with the new Contact. Therefore, create a method called updateContact() that receives a Contact as a parameter, then creates an instance of DocumentReference and passes it the documentId. Finally, calls its set() method with the Contact parameter.
...

public void updateContact(Contact contact) {
	String documentId = contact.getDocumentId();
	DocumentReference documentReference = contactsCollectionReference.document(documentId);
	documentReference.set(contact);
}

...
2.5.4 Method for Deleting Contacts
Lastly, let us create the method for deleting a Contact in the database. For this purpose, we have the method DocumentReference.delete(). It doesn’t need parameters, since DocumentReference is already representing the object to be deleted when passing it the documentId. Please create a method called deleteContact() that receives the documentId of the Contact to be deleted, then pass the documentId to a DocumentReference instance, and calls its delete() method.
...
public void deleteContact(String documentId) {
	DocumentReference documentReference = contactsCollectionReference.document(documentId);
	documentReference.delete();
}
...
2.6 Writing the Method for Sending Bulk Data to Cloud Firestore
Now, let us create a utility method to write bulk data to Firestore so that we have some available Contact entries to show later in the application main screen. Please create a method in our ContactsFirestoreManager class and name it sendContactsBulk(). It will perform a few calls to createDocument(), passing in some Contact objects to write them in our Firestore database.
...

public void sendContactsBulk() {

	// Create a new Contact document map of values and add it to the collection
	createDocument(new Contact("Jack", "Miller", "jmiller@gmail.com"));

	// Create a new Contact document map of values and add it to the collection
	createDocument(new Contact("Michael", "Johnson", "m_johnson@gmail.com"));

	// Create a new Contact document map of values and add it to the collection
	createDocument(new Contact("Chris", "Stanley", "chrisstnl@gmail.com"));

	// Create a new Contact document map of values and add it to the collection
	createDocument(new Contact("Jane", "Smith", "jsmith@gmail.com"));
}

...
We will be able to call our sendContactsBulk() method in the following section once we have initialized our ContactsFirestoreManager class from the frontend.
Part 3: Supplying the App with Data from Cloud Firestore
3.1 Get the Reference to the Firestore Manager
Awesome! Now, we are ready to start putting the pieces together.
Our first step is to get an instance reference of our singleton class ContactsFirestoreManager. Go to the ContactListMainActivity class, declare a class field of type ContactsFirestoreManager and initialize it in the onCreate() method.
...

/* Repository reference */
private ContactsFirestoreManager contactsFirestoreManager;

@Override
	protected void onCreate(Bundle savedInstanceState) {

	...

	// Get a reference of ContactsFirestoreManager
	contactsFirestoreManager = ContactsFirestoreManager.newInstance();
	...
}

...
3.2 Send Contacts to Cloud Firestore
Once we have initialized our contactsFirestoreManager instance, we are ready to call our utility method sendContactsBulk(). As mentioned before, the purpose of sending Contacts through this method is to have some documents available in Firestore. Later we will populate our main screen by retrieving those documents.
Go to the listener SendContactsBulkFloatingButtonOnClickListener and call sendContactsBulk().
	...

private class SendContactsBulkFloatingButtonOnClickListener implements View.OnClickListener {
	@Override
	public void onClick(View v) {
		contactsFirestoreManager.sendContactsBulk();
		Toast.makeText(ContactListMainActivity.this, "Bulk contacts sent", Toast.LENGTH_LONG).show();
	}
}

...
Build and run the application. Then, click the upload button () to send the bulk of Contacts. You will see a Toast message saying that the Contacts bulk has been sent.
You can go to the Firestore web console to confirm that the Contacts have been written in our database.
The calls of the add() method look for the “contacts” collection as we specified before to add the Contact. If the collection doesn’t exist, Firestore will create it. Once the collection exists, Firestore will add the intended Contact document.
3.3 Read Contacts from Cloud Firestore
Good job! Now, let us read those Contacts from Firestore and store them in a List that we will use afterwards to populate the screen. Go to the onStart() method and use contactsFirestoreManager to call getAllContacts(). Pass in a callback that brings us the result of the query to display on the main screen.
	...

@Override
protected void onStart() {
	super.onStart();
	// Populate the ContactListMainActivity with the available data
	contactsFirestoreManager.getAllContacts(new GetAllContactsOnCompleteListener());
}
	...
Now, let us add a callback called GetAllContactsOnCompleteListener. Its onComplete() method provides us with a Task object from which we get the contact List.
...
private class GetAllContactsOnCompleteListener implements OnCompleteListener<QuerySnapshot> {
  @Override
  public void onComplete(@NonNull Task<QuerySnapshot> task) {

  	if (task.isSuccessful()) {

  		// Get the query snapshot from the task result
  		QuerySnapshot querySnapshot = task.getResult();

  		if (querySnapshot != null) {

  			// Get the contact list from the query snapshot
  			contactList = querySnapshot.toObjects(Contact.class);
  		}

  	} else {
  		Log.w(TAG, "Error getting documents: ", task.getException());
  	}
  	...
  }
}
	...
3.4 Populate the Main Screen
Now, we are ready to populate our main screen with the List of Contacts.
Let us create the populateContactRecyclerView() method. It will receive the Contact List and pass it to an instance of our custom adapter ContactListMainRecyclerViewAdapter. Then, we will set that adapter to our RecyclerView to populate our main screen with Contacts.
Also, pass ContactListRecyclerViewOnItemClickListener as a second parameter. It is a custom listener of View.OnClickListener that will enable clicks on each Contact in the recycler view. Later, we will finish to implementing this listener.
...

private void populateContactRecyclerView(List<Contact> contactList) {
	// Set the contactListMainRecyclerViewAdapter in the contactListRecyclerView
  ContactListMainRecyclerViewAdapter contactListMainRecyclerViewAdapter = new ContactListMainRecyclerViewAdapter(contactList, new ContactListRecyclerViewOnItemClickListener());
  contactListRecyclerView.setAdapter(contactListMainRecyclerViewAdapter);
}

...
Lastly, go back to GetAllContactsOnCompleteListener and call our populateContactRecyclerView() method and pass the contact List.
...

// Get the contacts from the query snapshot and store them in contactList
contactList = querySnapshot.toObjects(Contact.class);

// Populate the recycler view with the contact list
populateContactRecyclerView(contactList)

...
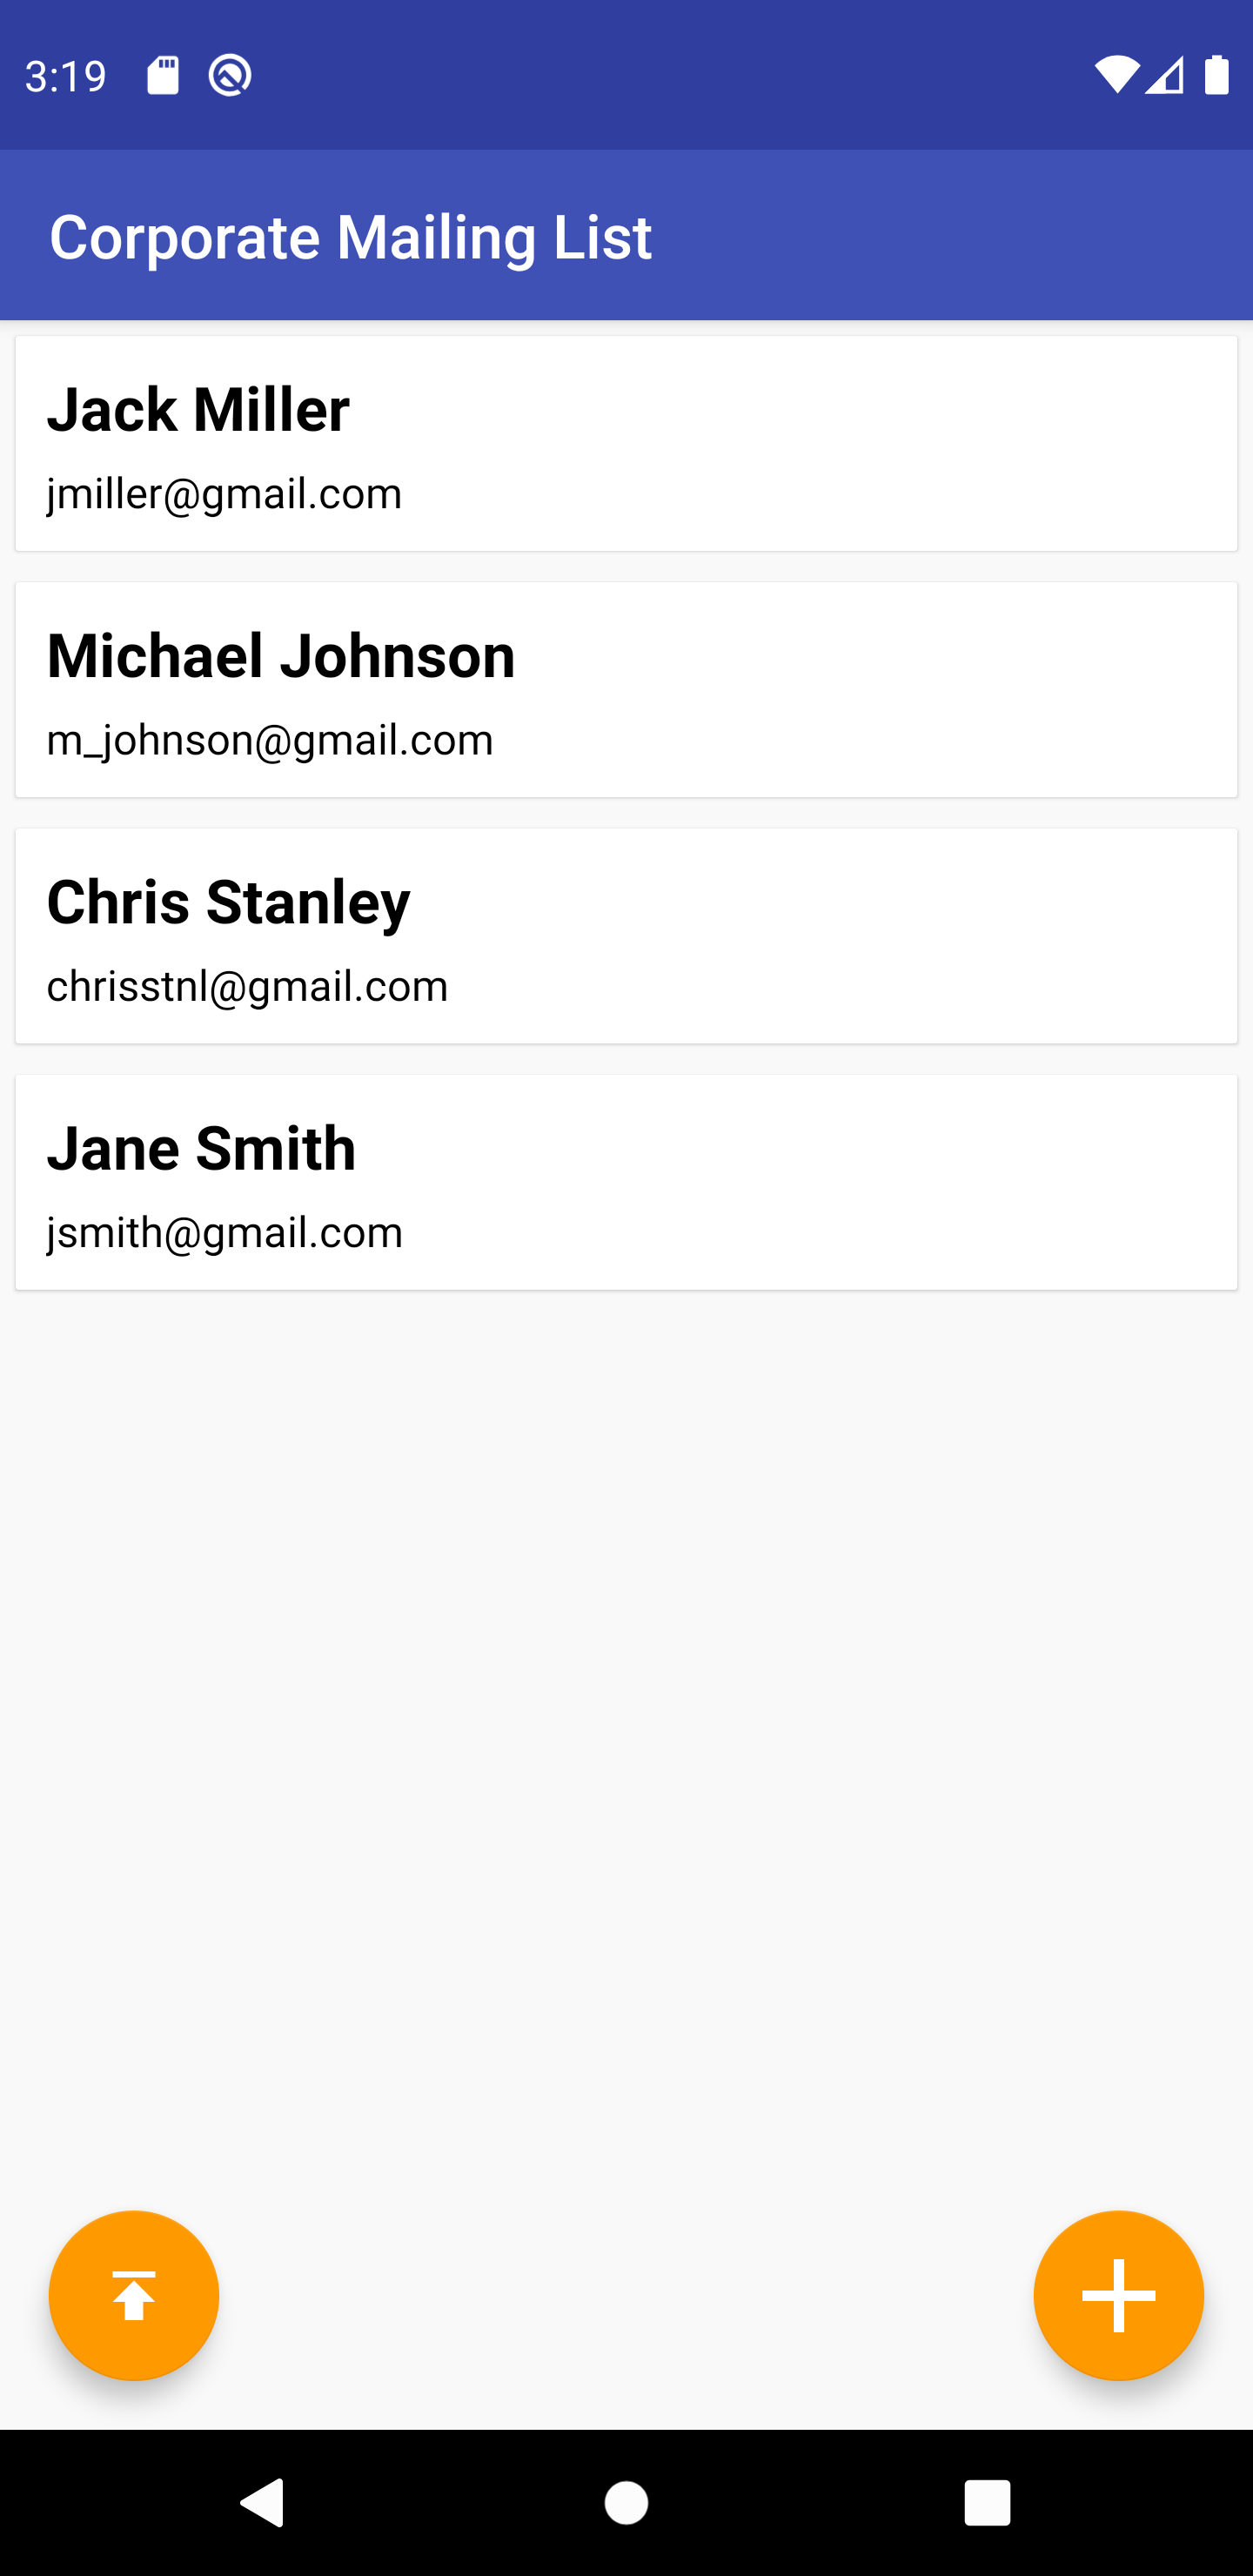
Let us try the application once more to test our progress. Build and run the application and this time you will be able to see Contacts in the main screen. Each Contact is presented in a CardView.
Part 4: Creating Data in Cloud Firestore from the Android Application
4.1. Creating a Contact
Now, let us add the functionality to create new Contacts in Firestore to the Contact Details screen.
As we did with the main screen, get an instance reference of our singleton class ContactsFirestoreManager. Go to the ContactDetailsActivity class, declare a field of type ContactsFirestoreManager, and initialize it in onCreate().
To create new Contacts from our Contact Details screen use again, the method createDocument() that we created in our ContactsFirestoreManager class.
In the ContactDetailsActivity class, go to the OKButtonOnClickListener and create a new instance of Contact. Pass in the Contact information from the form’s EditText objects.
Then, in the condition where the operation type is equal to “CREATING,” call createDocument() and pass in the new Contact we want created in Firestore.
...
private class OKButtonOnClickListener implements View.OnClickListener {
	@Override
	public void onClick(View view) {
		String firstNameString = firstNameEditText.getText().toString();
		String lastNameString = lastNameEditText.getText().toString();
		String emailString = emailEditText.getText().toString();
		Contact contact = new Contact(firstNameString, lastNameString, emailString);
		if (operationTypeString.equals(CREATING)) {
			contactsFirestoreManager.createDocument(contact);
		} else if (operationTypeString.equals(EDITING)) {
		}
		finish();
	}
}
...
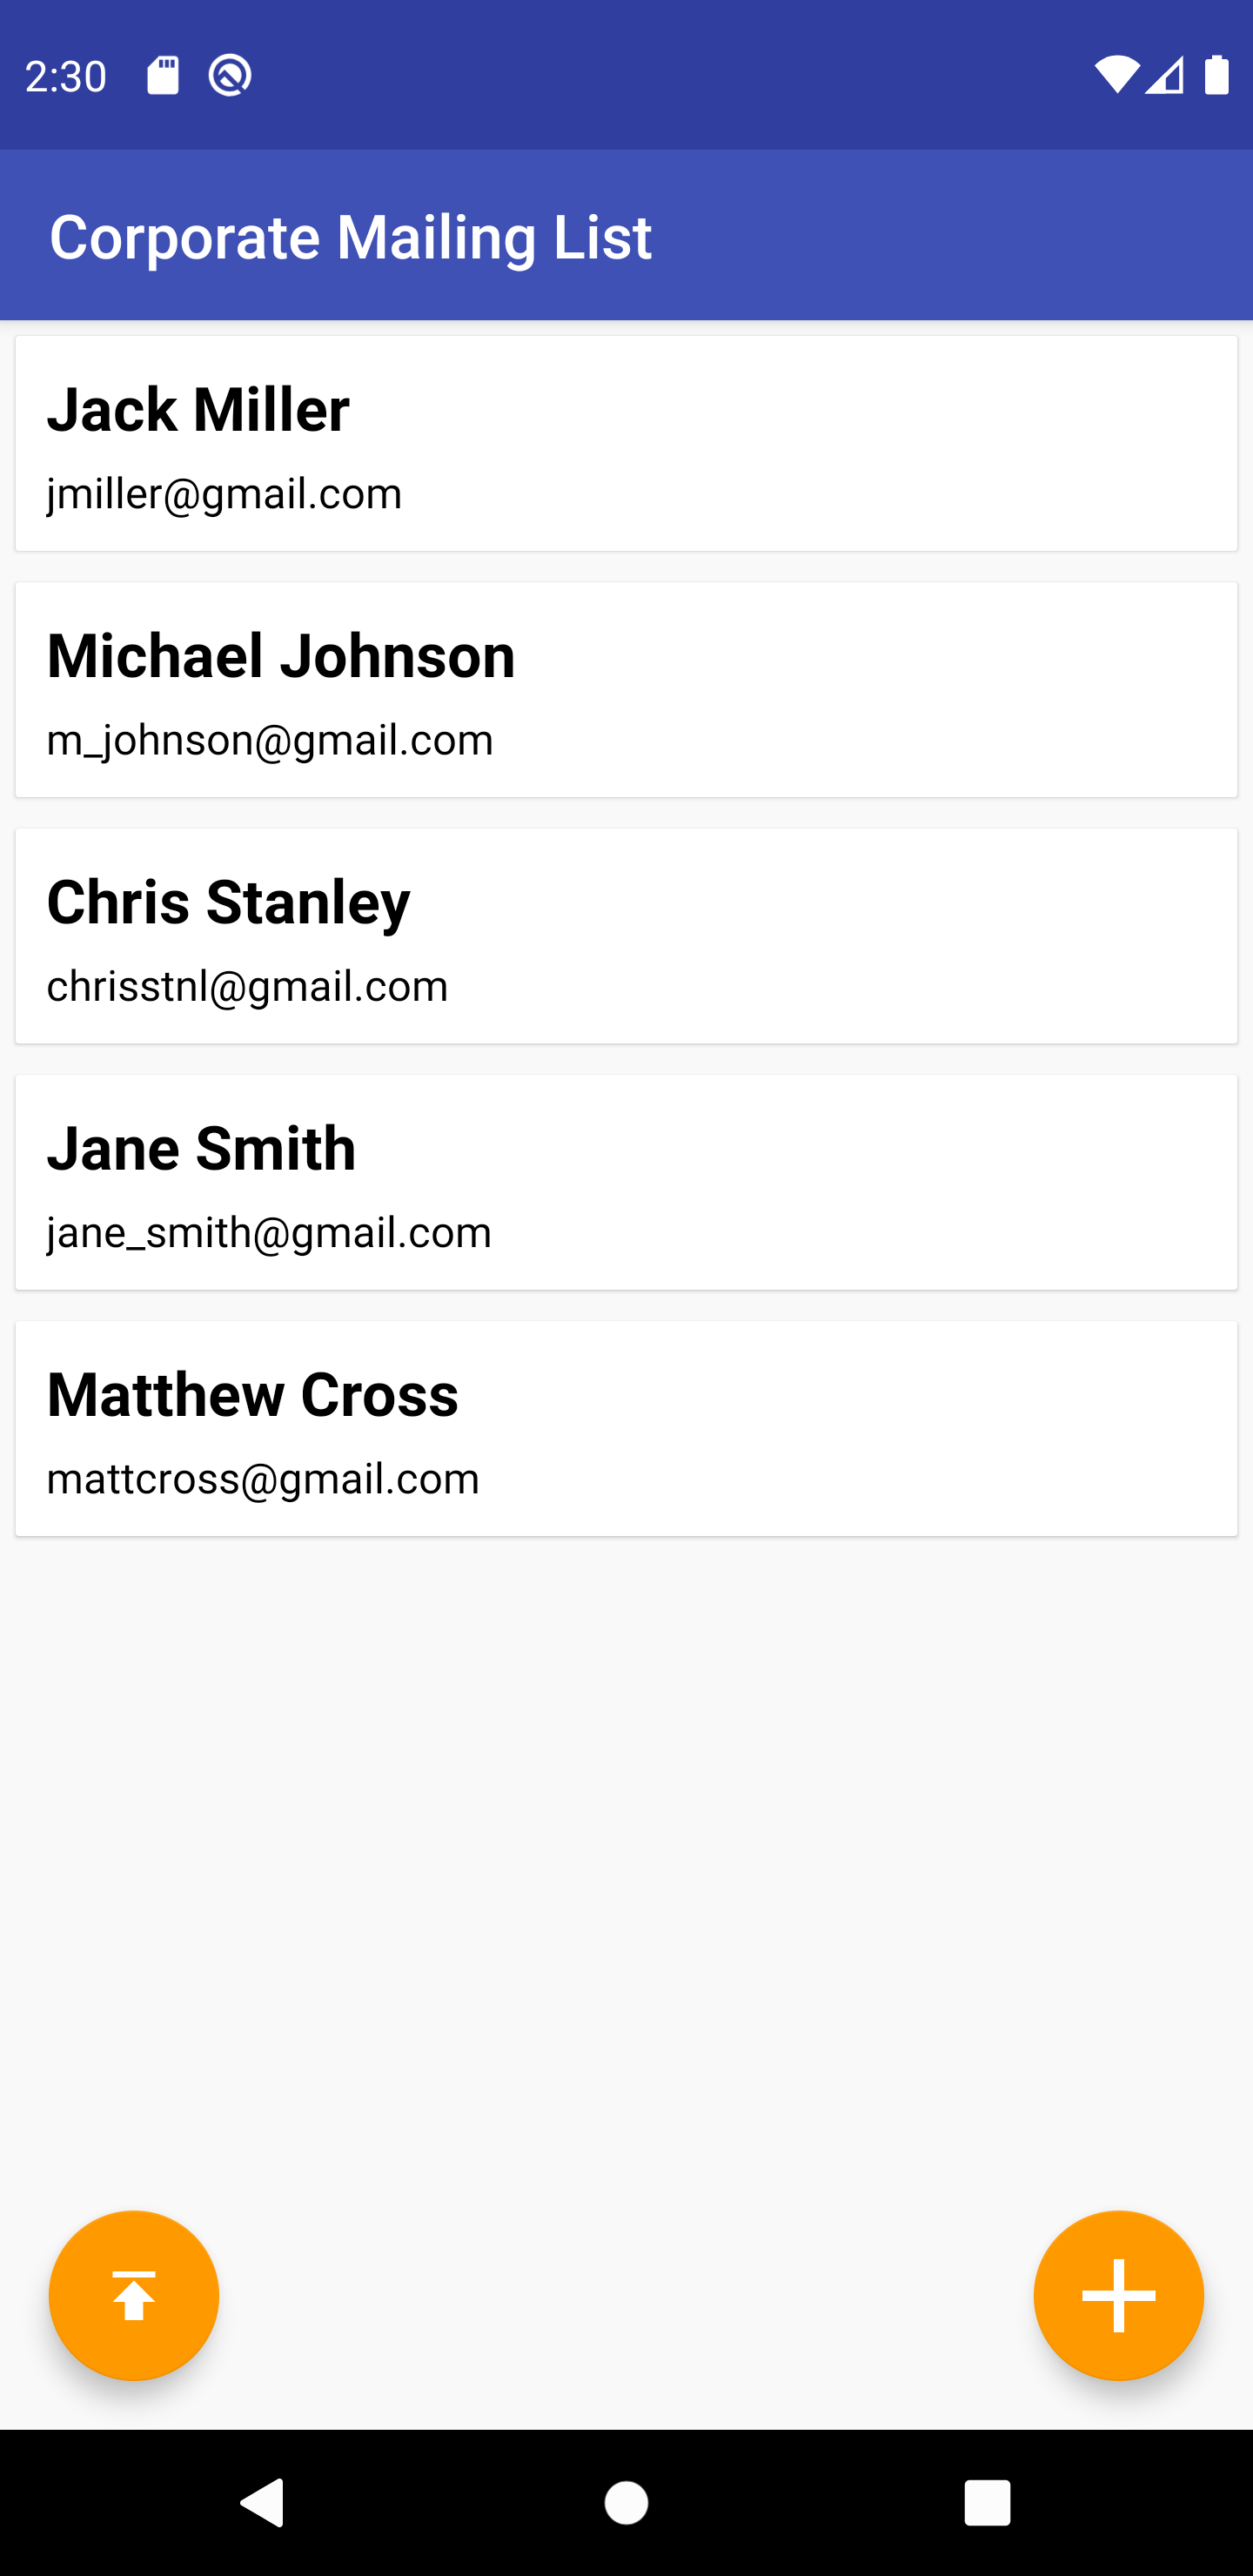
Go to the Contact Details screen and fill the form with Contact information and press the “CREATE” button. The application will take you back to the main screen and will show the new Contact in the RecyclerView.
4.2 Updating a Contact
It is a great moment to provide functionality to the custom listener located in the ContactListMainActivity class to help us select a Contact from the Contact list so we can edit its information in the Contact Details screen.
Go back to ContactListRecyclerViewOnItemClickListener. Its onClick() method provides a View. This View is the Contact’s CardView the user has clicked. We can use this to find the CardView’s position in the RecyclerView and the index of the related Contact object in the Contact List.
Next, we will get each Contact property (document ID, first name, last name, and email) and set them as Intent extras that pass to the ContactDetailsActivity to populate the screen with the details of the selected Contact.
...

/** Called when the user clicks on an item of the contact list */
public class ContactListRecyclerViewOnItemClickListener implements View.OnClickListener {
	@Override
	public void onClick(View view) {
		int itemPosition = contactListRecyclerView.indexOfChild(view);
		Contact contact = contactList.get(itemPosition);
		Intent intent = new Intent();
		intent.setClass(ContactListMainActivity.this, ContactDetailsActivity.class);
		intent.putExtra(ContactDetailsActivity.OPERATION, ContactDetailsActivity.EDITING);
		intent.putExtra(ContactsFirestoreDbContract.DOCUMENT_ID, contact.getDocumentId());
		intent.putExtra(ContactsFirestoreDbContract.FIELD_FIRST_NAME, contact.getFirstNameString());
		intent.putExtra(ContactsFirestoreDbContract.FIELD_LAST_NAME, contact.getLastNameString());
		intent.putExtra(ContactsFirestoreDbContract.FIELD_EMAIL, contact.getEmailString());
		startActivity(intent);
	}
}

...
Now, use those extras to populate the Contact Details screen. In the ContactDetailsActivity class, go to the onCreate() method, take the Bundle passed in as a parameter, and in the condition where the operation type is equal to “EDITING”, get the Contact properties (documentId, first name, last name, and email) and set them as text for each associated EditText.
...

@Override
protected void onCreate(@Nullable Bundle savedInstanceState) {
	super.onCreate(savedInstanceState);
	setContentView(R.layout.contact_form_activity);
	...

	} else if (operationTypeString.equals(EDITING)) {

		...
		documentId = bundle.getString(DOCUMENT_ID);
		firstNameEditText.setText(bundle.getString(FIELD_FIRST_NAME));
		lastNameEditText.setText(bundle.getString(FIELD_LAST_NAME));
		emailEditText.setText(bundle.getString(FIELD_EMAIL));
	}
}

...
We can now give the Contact Details screen the functionality to update Contacts. Go back to OKButtonOnClickListener, and this time, in the condition where the operation type is equal to “EDITING,” call updateContact() and pass in the updated information for the selected Contact. Firestore will use its Contact ID to identify the document and perform the update.
...

private class OKButtonOnClickListener implements View.OnClickListener {
	@Override
	public void onClick(View view) {

	...
	if (operationTypeString.equals(CREATING)) {
		...
	} else if (operationTypeString.equals(EDITING)) {
			contactsFirestoreManager.updateContact(contact);
		}

	...
	}
}

...
Updating a Contact should work, try it. Press on any Contact from the list, and the app will open it in the details screen. Edit the content of any field and press the “UPDATE” button. You can confirm that the Contact was successfully updated by either pressing once more on the same Contact from the list to see its details with the new information, or going to the Firestore web console and see your latest changes in that Contact.
4.3 Deleting a Contact
The last task to accomplish is the functionality to delete Contacts from Firestore. For this, we have another listener called DeleteButtonOnClickListener where we will call the deleteContact() method. This time, we only need to pass in the Contact ID and Firestore will use it to identify the document and delete it.
...

private class DeleteButtonOnClickListener implements View.OnClickListener {
	@Override

	public void onClick(View view) {
		contactsFirestoreManager.deleteContact(documentId);
		finish();
	}
}
Cloud Firestore Firebase Tutorial Final Results
Through this tutorial, you were able to build an Android application where you learned to:
- Set the Firestore SDK in your Android project by following the configuration steps of the Firestore assistant.
- Create CRUD methods (create, read, update, delete) to perform operations in a Firestore database.
- Use good practices that help maintain an organized application architecture by keeping those concerns related to database separated from those ones related to user interface when you:
- Created a contract class, that helps us to avoid errors along the source code caused by repetition.
- Created a database manager class, which encapsulates all the logic behind the database operations.
- Populate a RecyclerView with the list of contacts retrieved from Firestore, and then, give them the ability to be clicked and opened in a screen to show their information details.
- Create, update and delete information from Firestore through the Contact Details screen.
To keep taking advantage of Cloud Firestore and its potential, we recommend you review the following topics:
- Data binding – It helps the user interface to automatically receive changes and apply them in real time.
- Queries – Unlike Firebase, Firestore provides a robust set of queries you can take advantage from to perform powerful operations for retrieving, sorting and filtering.
Hope you had fun!
Photo by Danial RiCaRoS on Unsplash





0 Comments